Hands-On Linux Networking: Simulate Docker & Kubernetes Networks Using Namespaces
Linux DevOps Networking Kubernetes Docker CNI Network Namespace Containers Bridge veth
🛠️ Hands-On: Set Up red & blue Network Namespaces with Internet Access
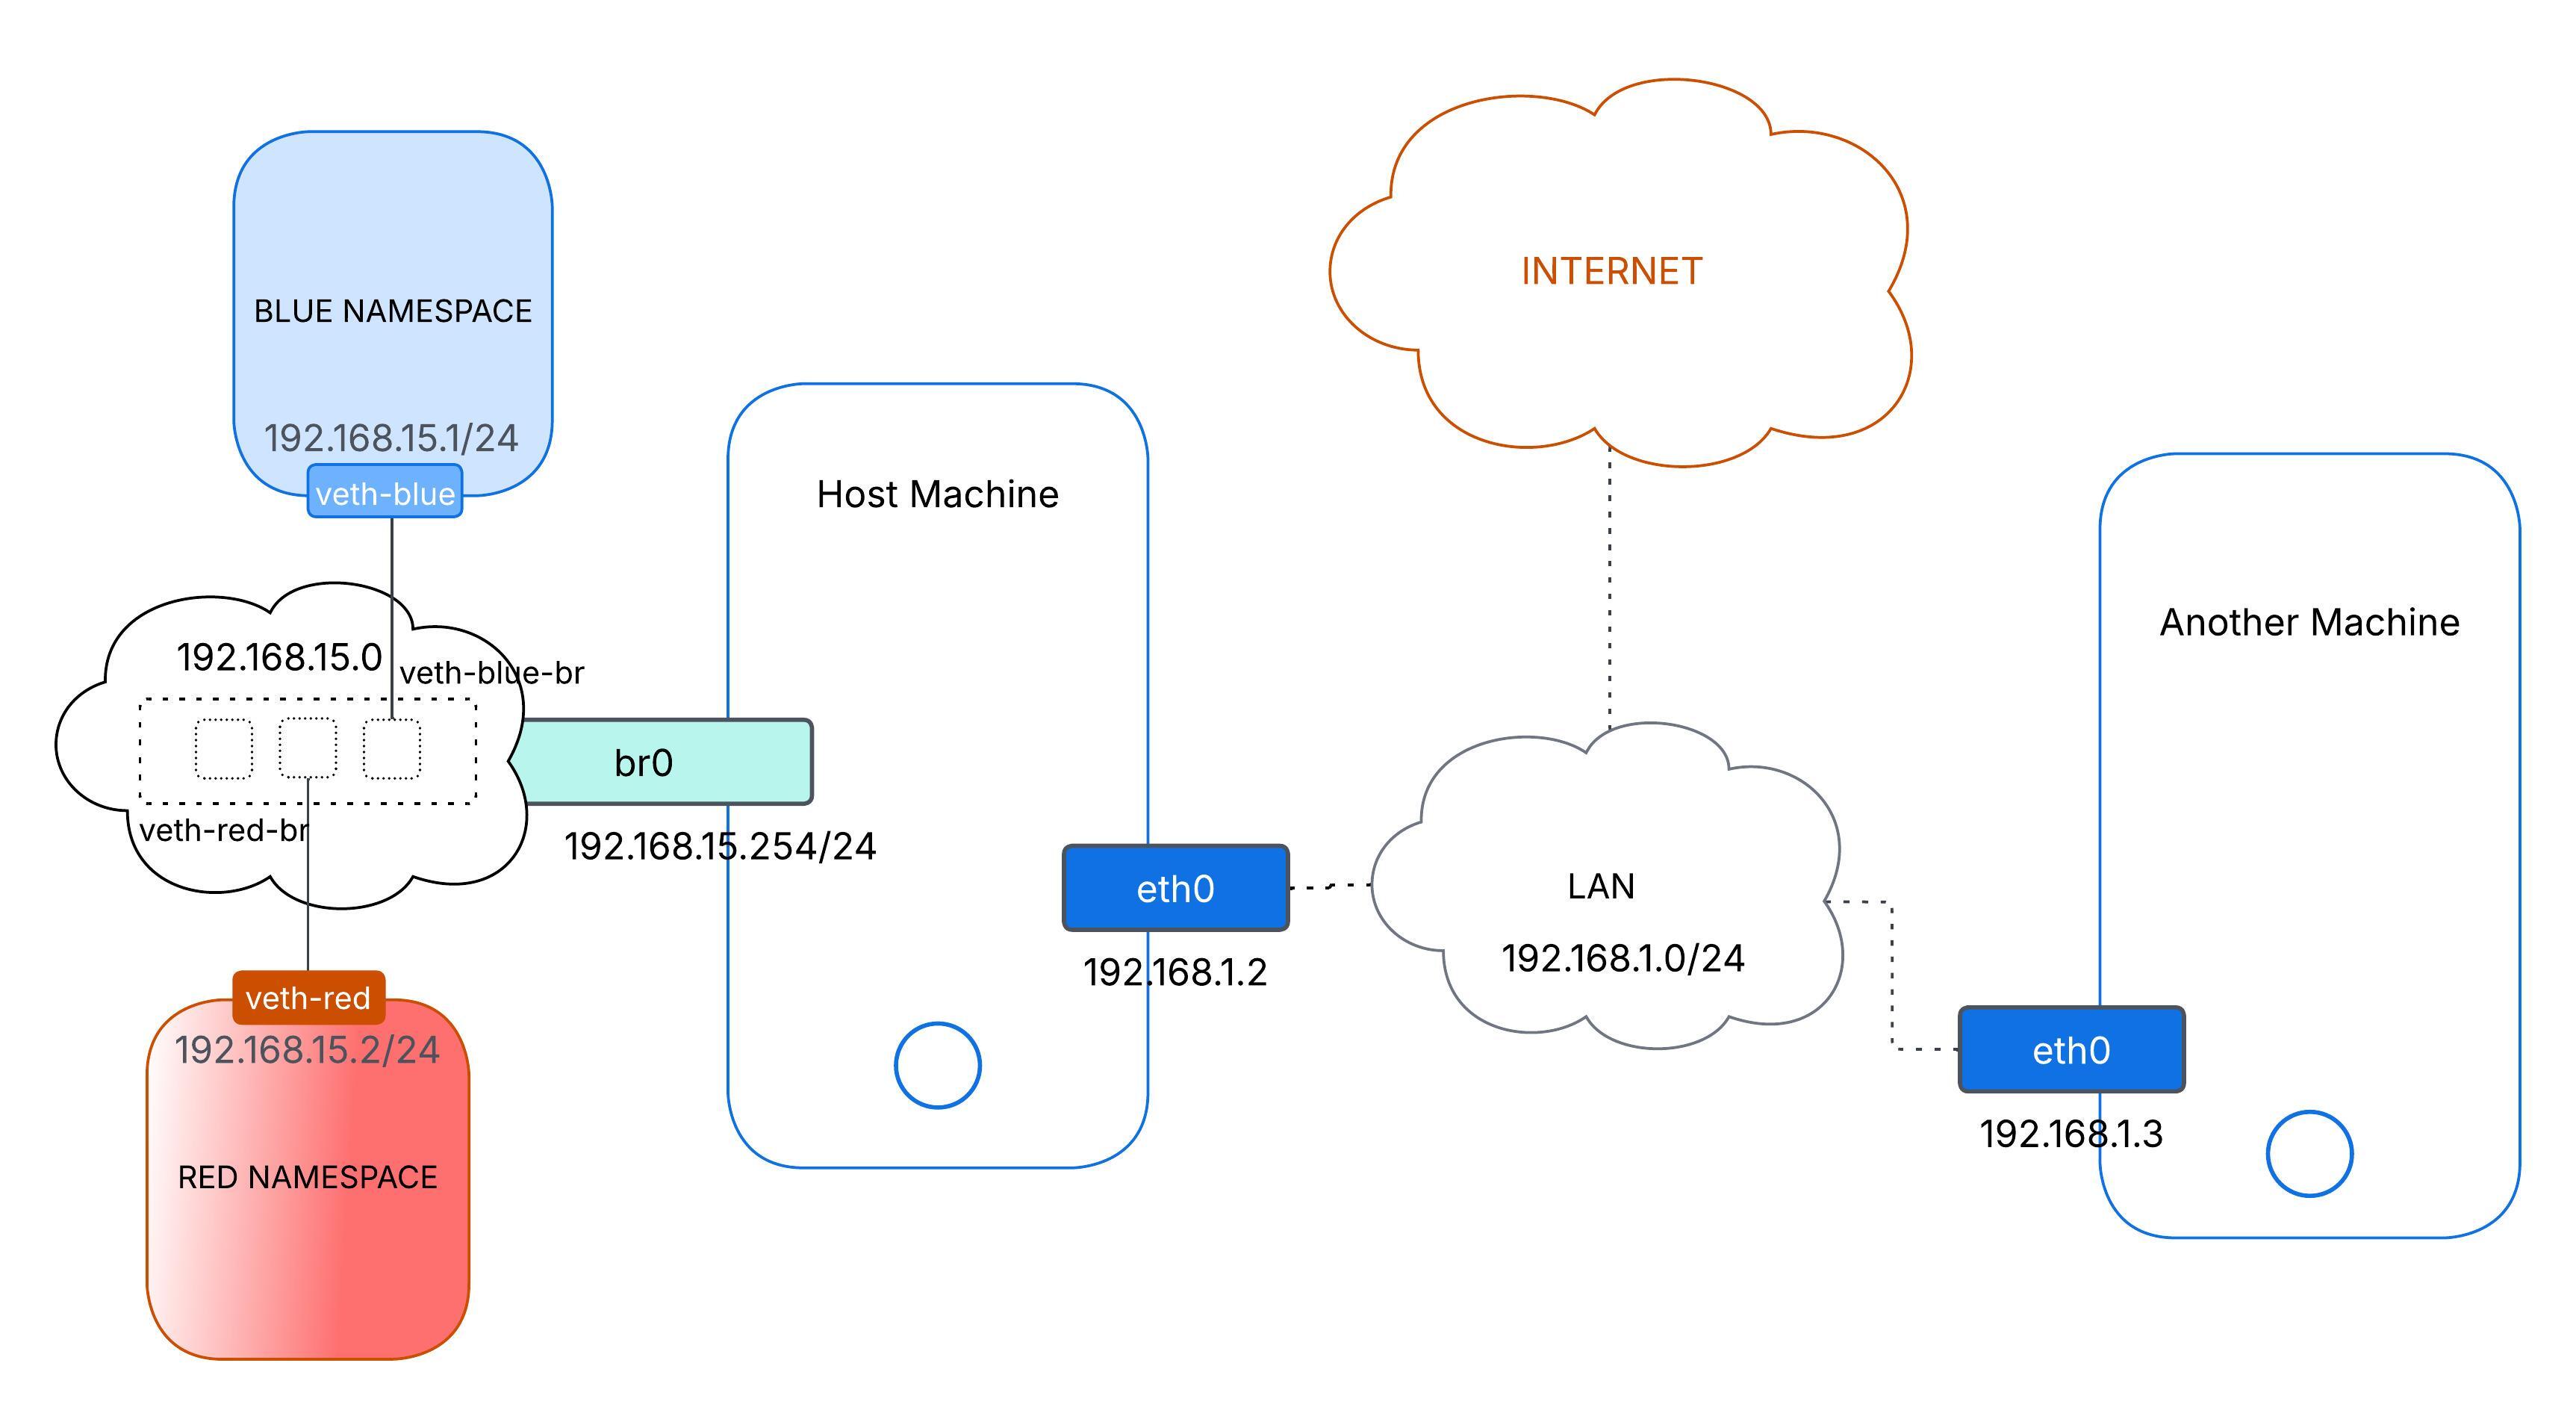
We are going to build two simple network namespaces—red and blue—connected by a host bridge (br0), with blue given a path to the internet. This is going to be a mini version of how Docker or Kubernetes sets up container networking.
This diagram shows:
- red and blue connected to the host bridge (
br0) br0reaching the outside world througheth0
1. Create the Namespaces
# Make two isolated spaces
ip netns add red
ip netns add blue
No magic here—just two clean slates.
2. Create Virtual Ethernet Pairs (veth)
ip link add veth-red type veth peer name veth-red-br
ip link add veth-blue type veth peer name veth-blue-br
Each veth pair has one end inside a namespace and the other on the host.
3. Move the veth Ends into Namespaces
ip link set veth-red netns red
ip link set veth-blue netns blue
Now veth-red lives in red, and veth-blue lives in blue.
4. Create and Bring Up the Bridge
ip link add br0 type bridge
ip link set br0 up
br0 will stitch red and blue together—and later connect to the internet via the host.
5. Attach Host Ends of veth to br0
ip link set veth-red-br master br0
ip link set veth-blue-br master br0
ip link set veth-red-br up
ip link set veth-blue-br up
Those -br interfaces become bridge ports.
6. Assign IP Addresses Inside Namespaces
# In red namespace
ip netns exec red ip addr add 192.168.15.2/24 dev veth-red
ip netns exec red ip link set veth-red up
ip netns exec red ip link set lo up

# In blue namespace
ip netns exec blue ip addr add 192.168.15.1/24 dev veth-blue
ip netns exec blue ip link set veth-blue up
ip netns exec blue ip link set lo up192.168.15.2/24→ red192.168.15.1/24→ blue
Now containers inside red and blue can connect to each other.
Q: Can I reach one of the interfaces of
redorbluefrom the host? e.g.ping 192.168.15.1A: Not yet. The host is on a different subnet (e.g.,
192.168.1.0/24), and it has no route to192.168.15.0/24.
7. Give the Bridge an IP for Routing
ip addr add 192.168.15.254/24 dev br0Note: This allows the host to communicate with namespaces over the
br0bridge.
192.168.15.254 acts as a local gateway. Assigning it to br0 gives the host direct access to the namespace subnet. Since red and blue are bridged to br0, the host can now reach them without NAT.
Without this, we’d need additional routing or NAT to access the namespaces.
Q: Can
redorblueping a machine on the host’s LAN? e.g.ip netns exec blue ping 192.168.1.3A: No, not by default. The namespace is in a different subnet and lacks a route to
192.168.1.0/24.
To inspect routing:
ip netns exec blue ip routeWe’ll see no route for LAN — and no default gateway.
8. Point Namespaces to the Bridge For Local Network (Set gateway)
ip netns exec red ip route add 192.168.1.0/24 via 192.168.15.254
ip netns exec blue ip route add 192.168.1.0/24 via 192.168.15.254
Now they know how to send traffic to the LAN—but replies still won’t make it back.
⚠️ Why? Remote LAN devices don’t know how to return packets to the 192.168.15.0/24 subnet. This is similar to our local machine with a private IP trying to access the internet—it works only if the gateway rewrites our source IP.
9. Masquerade blue to the Local Network
iptables -t nat -A POSTROUTING -s 192.168.15.0/24 -o eth0 -j MASQUERADEThis rewrites source IPs to appear as if they come from the host. Now LAN devices can reply successfully. ✅ Now Reply will come back once Turned on IP Forwarding
10. Turn on IP Forwarding on the Host
echo 1 > /proc/sys/net/ipv4/ip_forward
# To make it PERMANENT:
# echo "net.ipv4.ip_forward = 1" >> /etc/sysctl.conf && sysctl -p
This is essential. Without it, the host will drop forwarded packets.
🔑 Note: The below steps mimic LAN device connection but extend it to enable access to the internet from isolated namespaces.
10. Point Namespaces to the Bridge for Default Network (Set default gateway)
ip netns exec red ip route add default via 192.168.15.254
ip netns exec blue ip route add default via 192.168.15.254
Now red and blue send all non-local traffic to br0.
11. Masquerade blue to the Internet
# Swap eth0 for our real uplink iface
iptables -t nat -A POSTROUTING -s 192.168.15.0/24 -o eth0 -j MASQUERADE
Now
bluecan access the internet. The host replaces its source IP just like a home router.
12. (Optionally) Add DNS for Namespaces
mkdir -p /etc/netns/blue
echo "nameserver 8.8.8.8" > /etc/netns/blue/resolv.conf
# Repeat for red if needed
Without DNS config, namespaces can only resolve raw IPs.
🎉 Let’s Give It a Spin
# Check red → blue
ip netns exec red ping -c 2 192.168.15.1
# Check blue → red
ip netns exec blue ping -c 2 192.168.15.2
# Test internet from blue
ip netns exec blue ping -c 2 8.8.8.8
ip netns exec blue ping -c 2 google.com
All good? We’ve built our own micro-network!
🧹 Cleanup When You’re Done
ip netns delete red
ip netns delete blue
ip link delete veth-red-br
ip link delete veth-blue-br
ip link delete br0
iptables -t nat -D POSTROUTING -s 192.168.15.0/24 -o eth0 -j MASQUERADE
💡 Why This Matters
-
Docker-style Networking Like Docker’s
docker0, we used a bridge + veth to connect isolated environments. -
Kubernetes/CNI Basics Behind the scenes, CNI plugins (Calico, Flannel) follow these same steps: create namespaces, attach veths, assign IPs, and set up routes.
Now we can have practical experience with the core plumbing of container networking—go build and break things with confidence!
Happy learning! 🎉